Somewhere between finishing Laura’s maternity chair and starting on Nanny’s armchair, I started to think about doing paid reupholstery commissions. I mentioned this to a few people and was offered an old stuffover chair to have a go at. I call it the doll’s house chair because of its interesting back story. It was designed and built by William Lendon Prosser. He worked for Maples in London and was asked to make some chairs for Queen Mary’s Doll’s House. I had a look at the website and found some chairs in the king’s bedroom that look very similar.
I’ve grouped this chair with Ethel’s chair for this post as it was also made by Prosser. This time it was for his daughter, Ethel, in 1909. I started the chairs at different times but finished them together so I’ll keep the stages together where they overlap.


Both of these chairs were entertaining to strip down. The doll’s house was obviously done at a time when there wasn’t enough fabric to cover the seat using just one piece. Ethel’s chair had been stuffed with a dishcloth where the upholsterer had run out of stuffing and it had obviously had a glass of wine spilled on it at some point before its most recent upholstery. Both of them had been upholstered by enthusiastic amateurs so some of the techniques used were slightly questionable.


The process of stuffing the seat pad was the same for both. They needing webbing, a layer of hessian and an initial layer of bridal ties and coir stuffing. Because they are seats, they need more structure than the domed shape of Hannah’s piano stool. This is achieved by adding a layer of hessian over the coir. You then use a variety of stitches to secure the coir in place and to create a firm edge to the pad. I’m not even going to attempt to explain it here. If you want to learn and can’t make it to a class of workshop, I would recommend The Upholsterer’s Step-by-Step Handbook by Alex Law which has excellent step by step instructions and illustrations. After all that stitching, which is where you find out a curved needle is far superior to a straight one, you add another round of bridle ties and coir. This then gets covered in cotton felt and calico.
Doll’s house:
Ethel’s:
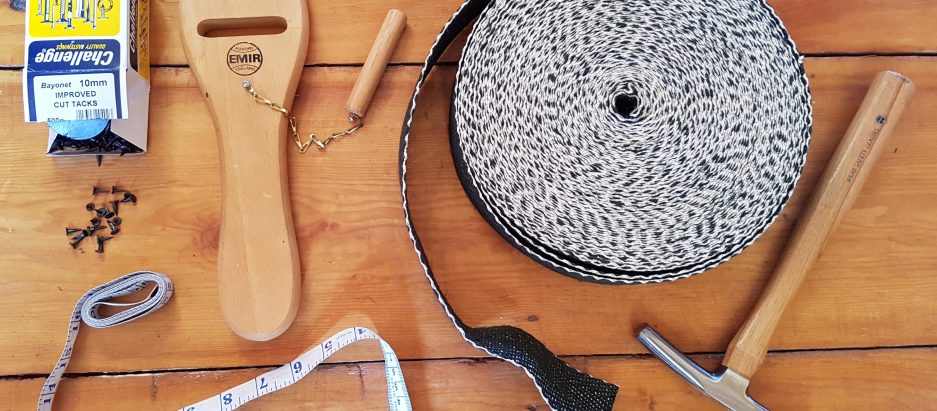
I next went in search of braiding to match my fabric. I cannot recommend enough going to your local haberdashery and just having a wander round. These little shops can be found in every town and so many are going out of business. In the two years since I started visiting mine, at least two have shut in my town. Nothing beats taking a swatch of your fabric and holding it up against various rolls of braiding. With the best will in the world, you can’t hope to match something exactly online.
I was unsure of some of the cuts needed to keep the fabric tight and smooth at the corners so at that point I took the doll’s house chair into class for some advice. Once I had learnt the difference between y, half y and diagonal cuts, I was on my way again.


The doll’s house chair was finished off with matching braiding around the bottom edge, covering the exposed tacks and giving it a neater look.
From then on, I could concentrate on Ethel’s chair. It was definitely older and the wood showed more signs of age. It had been absolutely full of tacks and they left a lot of holes behind. It showed how important it is to fill holes when you remove tacks because every hole impacts on the structural integrity of the frame. I didn’t have access to sawdust away from college so I bought some wood filler. It was horribly expensive and bright orange. It worked well enough, but in the pictures above and below you can see just how much I had to use.
When I moved on to the back panel of Ethel’s chair, I moved into uncharted territory. I knew from stripping the chair it had been stuffed in a similar way to the seat. The wood seemed pretty fragile so I decided to minimise the number of layers I added back on. I started with webbing, but as it was the back of the chair, I chose to add only three vertical lines with two horizontal. It was tricky getting the webbing stretcher around the ornate carving of the frame but I managed it. As you can see from the picture below it was a beautiful day and I was working outside so I was feeling pretty good about it all. As I walked away, I heard an almighty crack and turned around to see the bottom of the lengths of webbing hanging free with a chuck of wood attached. The pressure from the webbing had aggravated a weakness left in the wood from previous tacks and it ripped out some of the frame along the grain of the wood. After swearing loudly, I used wood glue to secure the piece of wood back into the frame, and tied it tight with string. I left the string there for the duration of the project. It was lesson in why wood filler is not a good idea. It dries incredibly hard which is fine if you are filling a hole in a door or a table. On a chair frame this presents a problem as it is also very brittle and if you hit a tack into it, it is likely to snap or fly out of the hole.


I ended up treating the back like a piano stool. I used small amounts of coir and kept everything as light as possible. Looking at it now, it also probably didn’t need the horizontal lengths of webbing.


I got frustrated because the tacks at the bottom of the rail wouldn’t stay. They just kept pinging out again because they couldn’t gain traction in the wood, and the tension of the calico bounced them out. Again I went back to classes for help and was advised to buy a staple gun. Given my feelings about removing staples, I wasn’t too keen on adding more but in the end having something actually stick in the wood was enough to persuade me.


The back of the chair was simple, just a layer of calico and then top fabric. I did the top fabric for the base too and then added all of the braiding. Note the strings still holding the rail in place. I finally removed them before doing the back.


Seeing the chairs lined up, with matching fabric, really brings out their similarities. You can see the skill and craftsmanship in the woodwork and I’m glad the upholstery now lets that shine through. I really wish I had trimmed the loose thread under the doll’s house chair before taking the picture though!
