I am quite brief in my descriptions of the actual process of reupholstering items. If I broke everything down every time I would end up writing a whole book and besides, I am firmly a believer that if you would like to learn how to do this, you should go to a class. However, when I was first starting out, I struggled to find any kind of materials online to remind me what my teacher had said, without it being a high speed video of someone with a staple gun. Staple guns have their place, but traditional upholstery does not use them and that’s why I try not to either.
Webbing is the foundation from which you build a firm, supportive base to any upholstered item with an open frame. The technique itself it not complicated and seeing as I am about to make a start on a new project, I thought I would create a post all about webbing.
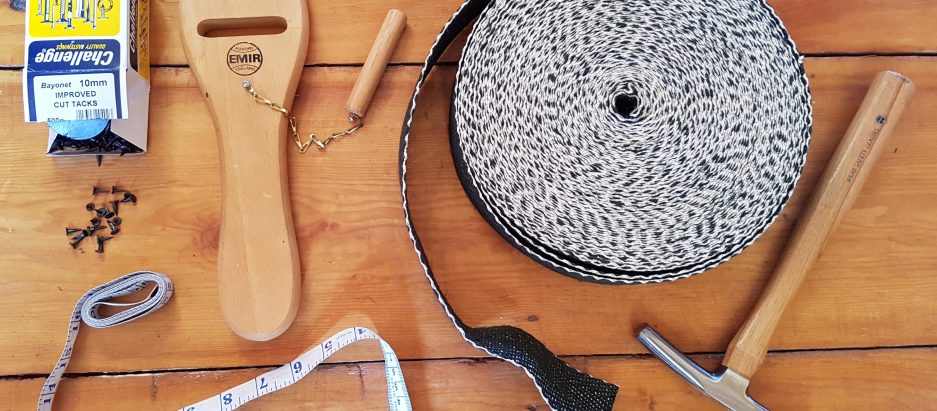
There are many types of webbing, commercially made products tend to use plastic webbing with very little stretch. Traditional upholstery uses mainly black and white cotton webbing or jute webbing. There is also elasticated webbing which you don’t need a webbing stretcher to tension but doesn’t last as long.
The price can also vary wildly, obviously the more you buy at one time, the better value you will get. In the past I have bought black and white cotton webbing from college for 75p per metre, or I can get it for 99p a metre at my local upholstery supply shop. Most recently, I bought a 33m roll online for £15 which should keep me going to a while!
The other materials you will need for webbing include a measuring tape, magnetic hammer, webbing stretcher and 10 improved tacks as well as a pair of scissors.

First you need to prepare your frame, filling any holes with a sawdust and glue mixture. Sand any lumps and bumps smooth and wipe off the wood with a damp, soft cloth. Look at your frame and decide which side would work better with a webbing stretcher. Flat, open sides are best so if one side has a curve, start there.
Mark out where the webbing will go with chalk. Start an inch in from each side of the frame, then add as many pieces as you can inbetween. When adding webbing, you need to keep the tension as even as possible. As a general rule, fit as much webbing as you can into a seat frame. The frames of chair backs don’t need as much as they aren’t supporting as much pressure.
Old frames are delicate and if you put several pieces of webbing on one side without balancing it out, the whole thing could collapse. Start with a vertical, central piece, then place a horizontal piece. Then work out from the middle, weaving the webbing as you go. Do not pre cut the webbing!
Tack down the end of the webbing with a little excess. Place three tacks in a triangle shape, then fold over the excess and tack it down with another three tacks in a inverted triangle. This way, the end of the webbing is very securely fastened with six tacks in total.


Next comes the stretching. The whole point of having tensioned webbing is that it provides support to whatever you put on top, be it springs or hessian and coir stuffing. A webbing stretcher is specifically designed to add tension to webbing. With all the will in the world, one person with two hands cannot hold the webbing tight enough and hammer in tacks at the same time.
Drop a loop of hessian down through the slot in the stretcher. Slide the wooden dowel through the loop to secure the webbing in the stretcher. Next, position the stepped end of the stretcher on the wooden frame and push down. This will stretch the webbing hard. Keep pushing until you can’t go any further. Using the hammer with a prepositioned tack, hammer one in to the middle of the webbing. Carefully load another tack while keeping the tension and carry on with the same triangle pattern as before. Once the first three tacks are in place, you can release the stretcher and cut off the webbing with enough excess to hammer in another three tacks.


Repeat, weaving the whole roll of webbing into place before you start tacking. You can’t stretch cut pieces of webbing as there wouldn’t be anything to pull on. Don’t worry too much if you mess up the weaving pattern, I did on my French footstool and I just built it into the pattern. You don’t want to keep removing tacks as they just leave extra holes and weaken the overall structure.

Every piece of furniture is different, with different webbing needs. The footstool above and the armchair below need webbing to support springs. The footstool was fully sprung so it needed webbing closely and across the whole frame. The armchair back only has three springs for lumbar support so the webbing only needed to reach the middle of the back of the frame. The basics are the same though, for the vertical webbing, I centred the first piece and spaced out the other two pieces an inch away. For the horizontal pieces, I started an inch up from the bottom, then continued with inch wide gaps. The webbing is two inches wide so it is much easier to work in imperial measurements.

Both of these pieces are sprung, so the webbing goes on the back of the frame. If there next step is hessian and stuffing, the webbing goes on the top of the frame, like this little chair:

This particular chair is a modern, mass produced model and has quite a thin frame. It had staples originally so I used my staple gun for the webbing. It was incredibly frustrating because despite having an electric stapler, the power was just not strong enough and every time I pulled on the webbing, the staples gave. Luckily, this chair is quite small and destined for a bedroom so it doesn’t need as much tension in the webbing as if it were going in to a dining room or kitchen. Eventually, with me pushing down hard on the stapler, I managed to get it all in. I will be upgrading my stapler befo re I move on to the next layers for this chair!
I hope this is helpful for someone, it’s something I looked for and couldn’t find when I was starting out. All of the above is only how I was taught, I have already read about several different ways of working but this is what works best for me.
This is brilliant! Your information and photos are such a help to me. I discovered that a Queen Anne chair I had been ignoring for years after picking it up in a thrift store for $5 is an antique with very good legs and it needs help. Someone started reupholstering it years ago but abandoned the project, leaving the back exposed. I turned it over and noticed the jute stretchers and under-spring fabric is stretched out and breaking down, so I determined that I had to find a way to repair this. I thought making cabinet-makers putty from hide glue and sawdust to fill the many old empty tack holes might be a good idea but I lacked confidence until I saw this wonderful lesson you published. Also, it never occurred to me that I might be able to put the bottom under-spring webbing at the bottom of the lower frame instead of at the top, where it is now. You have been so helpful . . . THANK YOU! I am in the great wasteland called California and have been utterly unable to find quality webbing so I’m going to try to make something myself out of some sturdy, heavy hemp canvas I own. It’s not a perfect solution but it has to be better than worn-out fraying jute!
Thank you! I came looking for this exact kind of straightforward information, as a beginner looking to redo an old chair. Incredibly helpful!