Having signed up to classes quite late and with no prior thought, I found myself without a project to take with me. As luck would have it I was going to an engagement/house warming party the week before term began. It was the last month I was still being paid from my teaching job but it was the end of the summer holidays and I had far too much time on my hands, so I baked a cake and set off for the party.


Over one of our typical million mile an hour catch up sessions before everyone else arrived, I mentioned that I needed a small chair or stool to take to my first class. I could see their eyes light up at the opportunity to get rid of one of the many items left by the previous owners of their new house. The groom to be was dispatched to the garage and came back with a little piano stool. It had a sweet shape to it but it had once been upholstered in some sort of red velvet that was now disintegrating at the slightest touch. It was perfect.
I arrived at the class clutching the lid of the piano stool, it had come off easily because the hinges had also completely given out. I had hastily bought one of each sewing item from the local supermarket and had emptied my nail varnish out of my only suitably sized bag in order to create a make shift sewing kit. I was nervous, but also excited to be there and very ready to learn. I positioned myself at the front of the queue and after we newbies had been shown the existing students’ projects, I was first in line to get started.
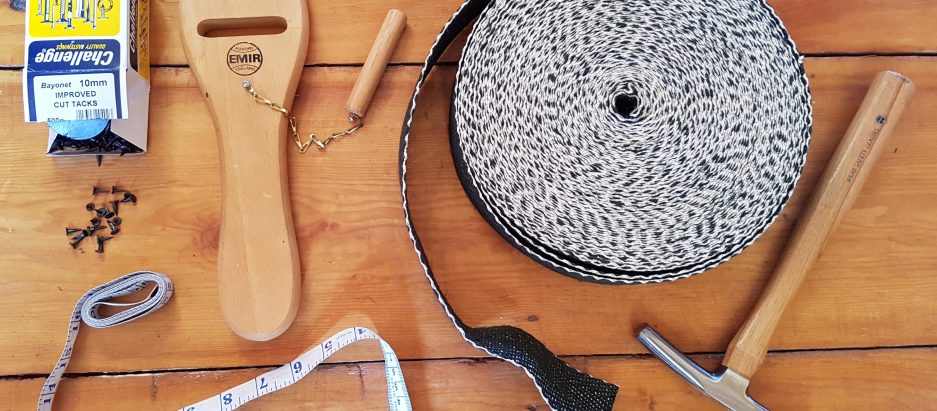
A piano stool is such a good starter project. It takes up very little room and makes little mess. The only tools you need initially are a wooden mallet and a tack lifter but a flat head screwdriver would work in a pinch. To fill the holes left from the old tacks, a paste of sawdust and pva glue is better than any wood filler which tends to harden so much that if you hammer another tack in on top, it can just fly out of the hole. The 12oz hessian then gets tacked on top. You start with a tack hammered half way on (temporary tacking) at the midway point of each side, with the hessian turned back in on itself. You space the tacks about an inch apart from each other.


Tacks come in various sizes. As a rule, you use the smallest size you can get away with as any tack will damage the wood, so you want to mitigate that damage. For hessian, you use an improved tack, this means the head is larger that a fine tack, one with a smaller head. For this project I started off using 10 improved tacks.
At this point I realised I needed to paint the top because if I left it any later I would risk painting the top fabric. I used Farrow and Ball tester pots which gives good coverage after 3 or 4 coats. (Please excuse the messy house!)


After you attach the hessian, you bridle it. This involves using barbour twine to make a big looping back stitch the length of four finger’s width and then looped under between the middle two fingers. You end up with overlapping loops of twine. The most common stuffing material is now coir or coconut fibre. You make sausages or cigars out of the coir, and then fit them under the loops, tightening as you go. You work around the edge of the panel first, then make a new set of loops, an inch or so in from the first round. Once the whole panel is covered, you pull the cord tight and tie off the ends, it destroys your fingers! After that I added two rectangles of cotton felt, the first one the same size as the panel (pictured) and the second large enough to reach down over the sides. The most satisfying stage is when you then put on the calico. You move to 10 fine tacks because the calico has a closer weave than hessian so you don’t need the larger heads. Like the hessian, you start in the centre of each panel, temporary tacking and pulling the calico tight as you go, keeping the pressure even by adding to each side of one panel and then moving on.


The next stage was probably the most frustrating for me as I am so impatient! You have to weigh down the stuffing and leave it for a few days.Then, remove the tacks from two sides and retighten. If you run your hand across the top and there is loose fabric, it needs tightening. This can also be a pain on your hands and you are constantly pulling and stretching the calico. The corners can be difficult, you only want one pleat so a tight, tidy hospital corner is the only way to go.


Finally, it’s time for the top fabric. I chose a dark grey fabric to complement the cream colour I had painted the frame. This goes on in the same way as the calico, trying to put the tacks in on the same level as the ones in the calico. This makes trimming off the excess and fitting the braiding so much easier. I used black braiding I bought on eBay but any other colour I would recommend buying in person where you can be sure the colour is right. The braiding is glued on using Uhu or a glue gun, with gimp pins (very thin coloured tacks) to secure it while the glue dries.

The join in the braiding goes at the back, off centre where it is less noticeable. If you fold over the ends before joining them, it prevents fraying as well.
Once I finished the top, which took around 5 weeks of 2 hour long classes, I took it home. Now I know what I’m doing, this kind of project would only take an afternoon, plus the time in the middle for the stuffing to settle. I had to replace the hinges which turned out to be harder than anticipated as it was easy to match the width, but the holes were in a different place and I managed to push the drill out through the side when it hit a bit of old screw left in the bottom. Luckily I managed to sand the mark away and repaint. Here is the finished product:

Ta-dah!